[Laravel] 如何自己做套件
剛好最近公司內部有提需求,希望我自己可以把一些功能包成套件
這樣後面的人需要的話,就可以直接掛在 vendors 底下
就不需要重工了!
有鑑於此,我去看了一下官方文件,好像沒有寫得很清楚
如果有人看到官方哪邊有提供,可以在底下回覆我,我會非常感謝QQ
於是乎,我跟著別人寫好的文章
1. 可以先產一個 laravel 的專案,或是用原有的專案都行,目的只是可以用指令產一些需要的檔案,比較方便 composer
2. 在這個專案內新增一個 packages 的目錄,存放要做的套件,我這裡用 neil/text2address 當範例,先建立目錄之後,執行 composer init,初始化套件
composer 範例可能會像下面
3. 之後建立 src 目錄,並新增相關檔案 Text2Address.php 與 Text2AddressServiceProvider.php,如果會使用到 config,可在與 src 同一層的地方新增 config,關於 config 的設定可以參考這裡
5. 在使用此套件的專案的命令列下
6. 接著在 config/app.php 底下註冊 Provider
7. 接下來就可以在你需要的地方使用 Text2Address 這個套件了,用法:
8. 如果想要上傳到 github 與 packagist 上的話,一定要記得加上 tag,這樣 packagist 才知道要抓哪些版本給用戶!
之後就可以自行提交給 Packagist 上囉!
這樣基本上就大功告成囉
以上步驟是參考這篇與官方網站上的資訊
這樣後面的人需要的話,就可以直接掛在 vendors 底下
就不需要重工了!
有鑑於此,我去看了一下官方文件,好像沒有寫得很清楚
如果有人看到官方哪邊有提供,可以在底下回覆我,我會非常感謝QQ
於是乎,我跟著別人寫好的文章
1. 可以先產一個 laravel 的專案,或是用原有的專案都行,目的只是可以用指令產一些需要的檔案,比較方便 composer
composer create-project laravel/laravel TestPackage2. 在這個專案內新增一個 packages 的目錄,存放要做的套件,我這裡用 neil/text2address 當範例,先建立目錄之後,執行 composer init,初始化套件
mkdir -p packages/neil/text2address && composer initcomposer 範例可能會像下面
{
"name": "neil/text2address",
"description": "Translate text to address component of google",
"license": "MIT",
"authors": [
{
"name": "Neil",
"email": "neil@test.com"
}
],
"minimum-stability": "dev",
"require": {
"php": "^7.1",
"illuminate/support": "~5.4|~6.0"
},
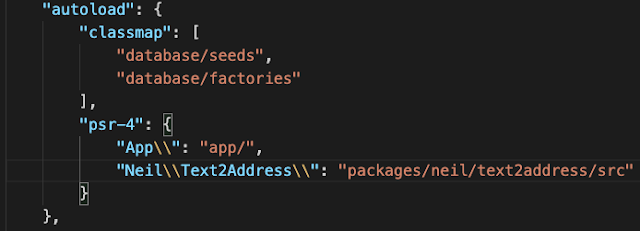
"autoload": {
"psr-4": {
"Neil\\Text2Address\\": "src/"
}
},
"extra": {
"laravel": {
"providers": [
"Neil\\Text2Address\\Text2AddressServiceProvider"
]
}
}
}
3. 之後建立 src 目錄,並新增相關檔案 Text2Address.php 與 Text2AddressServiceProvider.php,如果會使用到 config,可在與 src 同一層的地方新增 config,關於 config 的設定可以參考這裡
// Text2Address.php
<?php

namespace Neil\Text2Address;

class Text2Address
{
    private $apiKey;
    private $useCustomFormatter = false;
    private $selfFormatter;

    public function __construct()
    {
        $this->apiKey = config('google_api.place_api_token');
    }

    public function test()
    {
        echo "Test";
    }
}
// Text2AddressServiceProvider.php
// 可以先在外層專案使用 php artisan make:provider Text2AddressServiceProvider
// 之後再將檔案移動到 packages/neil/text2address/src 下
// 記得要改 namespace 為 Neil\Text2Address;
<?php

namespace Neil\Text2Address;

use Illuminate\Support\ServiceProvider;

class Text2AddressServiceProvider extends ServiceProvider
{
    /**
     * Register services.
     */
    public function register()
    {
        // 讓使用者可以覆蓋套件的預設設定
        $this->mergeConfigFrom(
            __DIR__ . '/../config/google_api.php',
            'google_api'
        );
    }

    /**
     * Bootstrap services.
     */
    public function boot()
    {
        // 這段主要是可以讓套件將自己使用的 config 檔案,
        // 透過 php artisan vendor:publish --tag=text2address_google_api
        // 將套件內使用的 config/google_api.php 這個檔案可以複製到外層專案
        // 再使用 $this->mergeConfigFrom 讓使用者可以覆蓋套件的預設設定
        // 第二個參數 'text2address_google_api' 就是 vendor:publish --tag=
        $this->publishes([
            __DIR__ . '/../config/google_api.php' => config_path('google_api.php'),
        ], 'text2address_google_api');
    }
}
// config/google_api.php
<?php

return [
    'place_api_token' => env('GOOGLE_PLACE_API_TOKEN', ''),
];

5. 在使用此套件的專案的命令列下
// 產生新的 autoload_classmap
composer dump-autoload
6. 接著在 config/app.php 底下註冊 Provider
 // config/app.php
'providers' => [
        // ...
        Neil\Text2Address\Text2AddressServiceProvider::class,
],
7. 接下來就可以在你需要的地方使用 Text2Address 這個套件了,用法:
// 在需要用到的地方最上面先 use
use Neil\Text2Address\Text2Address;

// 可以在 construct 裡面用注入,也可以自己另外 new 出來
protected $text2Addr;
public function __construct(Text2Address $text2Addr)
{
    parent::__construct();

    $this->text2Addr = $text2Addr;
}

// 接著可以在需要的地方直接使用 $this->text2Addr->test()
public function index()
{
    $this->text2Addr->test();
}
8. 如果想要上傳到 github 與 packagist 上的話,一定要記得加上 tag,這樣 packagist 才知道要抓哪些版本給用戶!
// 切換到 packages/neil/text2address
cd packages/neil/text2address
// git 初始化
git init
git add .
git commit -m "first commit"
git remote add origin 自己 github 的 repository
git push -u origin master
git tag -a 1.0.0 -m "First version"
git push --tags
之後就可以自行提交給 Packagist 上囉!
這樣基本上就大功告成囉
以上步驟是參考這篇與官方網站上的資訊

留言
張貼留言