發表文章

目前顯示的是 2019的文章

[Laravel] 如何自己做套件

圖片
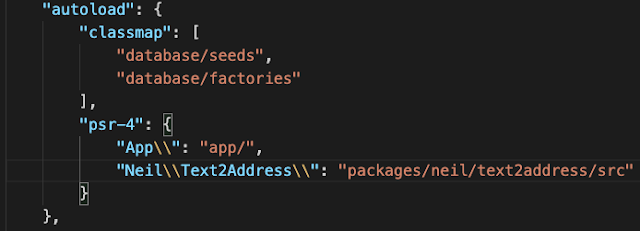
剛好最近公司內部有提需求,希望我自己可以把一些功能包成套件 這樣後面的人需要的話,就可以直接掛在 vendors 底下 就不需要重工了! 有鑑於此,我去看了一下 官方文件 ,好像沒有寫得很清楚 如果有人看到官方哪邊有提供,可以在底下回覆我,我會非常感謝QQ 於是乎,我跟著別人寫好的文章 1. 可以先產一個 laravel 的專案,或是用原有的專案都行,目的只是可以用指令產一些需要的檔案,比較方便 composer composer create-project laravel/laravel TestPackage 2. 在這個專案內新增一個 packages 的目錄,存放要做的套件,我這裡用 neil/text2address 當範例,先建立目錄之後,執行 composer init,初始化套件 mkdir -p packages/neil/text2address && composer init composer 範例可能會像下面 { "name": "neil/text2address", "description": "Translate text to address component of google", "license": "MIT", "authors": [ { "name": "Neil", "email": "neil@test.com" } ], "minimum-stability": "dev", "require": { "php": "^7.1", "illuminate/support": "~5.4|~6.0" }, "autoload

[wrk] 壓力測試工具 - wrk

Ref:  https://github.com/wg/wrk 基本的指令就不太多闡述,github裡面有 主要是需要在 wrk 送出時新增 header, 可以透過 -s 去呼叫自己寫的 .lua 腳本 現在有個情境,驗證時需要將其他變數md5並放入 header 中,該怎麼做? 範例: -- 這行必須設定,因為 md5.lua 會放在同層目錄,方便引入 package.path = '/Users/neil/Desktop/all_projects/project/wrk/?.lua' -- 引入同層的 md5.lua md5 = require 'md5' a = "a" b = "b" -- 取得系統時間 time = os.time() -- 做 md5, 字串串接是使用 .. checksum = md5.sumhexa(a .. b .. time) wrk.method = "POST" wrk.headers["time"] = time wrk.headers["checksum"] = checksum wrk.headers["a"] = a wrk.headers["b"] = b wrk.headers["Content-Type"] = "application/json" -- 以下是將 response 寫入到檔案中 -- file = io.open('/Users/neil/Desktop/all_projects/project/test.log', 'a') -- io.output(file) -- response = function(status, header, body) -- -- io.write("status:" .. status .. "\n"); -- io.write(body .. "\n"); -- end -- done = function(summa

[Mac] 使用 wrk 時,出現 Too many open files

Ref:  https://superuser.com/questions/433746/is-there-a-fix-for-the-too-many-open-files-in-system-error-on-os-x-10-7-1 可以使用 sysctl -w kern.maxfiles=60000 sysctl -w kern.maxfilesperproc=60000 來增加可開啟檔案的上限, 如果是一般 linux 的話,可以使用 ulimit -HSn 60000

[MySQL] MySQL 系統參數設定

sql_mode="" 主要為sql內部特殊規則限制,通常方便工程師會特別設定成"",代表空值不做任何限制,因為不保證工程師都能寫出高品質的SQL語句 sync_binlog=0 innodb_flush_log_at_trx_commit = 0 兩個特別是影響資料庫刷盤的參數,第一個指binlog刷盤,第二個指資料異動的刷盤,都設定為0速度最優,通常只有Master需要改成雙0,雙1的話安全性最高但最慢 max_connections = 5000 連線數上限 connect_timeout=10 連線timeout秒數 open_files_limit = 65535 能同時開啟檔案的上限 max_allowed_packet = 500M 能接受的封包最大值 transaction-isolation = REPEATABLE-READ 資料安全性隔離等級 RR為預設 query_cache_size = 0 query_cache_type = 0 過時的快取設定,兩組都設定為0,才能徹底關閉 expire_logs_days = 7 binlog保留天數,如果有硬碟空間問題,可以嘗試減少,但是相對備份檔案的有效保存期限 slow_query_log=1 long_query_time=1 slow_query_log_file=/var/lib/mysql/slow.log log_throttle_queries_not_using_indexes=1000 min_examined_row_limit=1000 log-slow-admin-statements = TRUE 慢查詢相關記錄設定,基本上有點能力的DBA才能處理優化,目前只需要開啟紀錄即可 innodb_file_per_table = 1 讓innodb的data實體檔案 .ibd文件從ibdata1獨立出來,分散寫入改善整體效能 innodb_buffer_pool_size = 3G *最重要影響資料庫讀取效能沒有之一 innodb引擎的快取層吃多少記憶體的設定,通常試情況設定為實體80%左右佔成

[Node.js] require 的機制

最近在面試的時候, 寫了一些基本的題目, 但是卻有些地方是我自以為清楚, 但是不清楚的地方, 那就是這次要寫的 require! 其實一般人使用應該都會知道 require 完後, Node.js 會把 require 的物件, 會快取在記憶體內, 但是由於我真的太久沒寫, 所以在沒有理解的情況下, 也會忘記是不是真的每次 require 後就會存在記憶體中, 所以這次來分析一下原始碼 https://github.com/nodejs/node/blob/master/lib/internal/modules/cjs/loader.js // Loads a module at the given file path. Returns that module's // `exports` property. Module.prototype.require = function(id) { validateString(id, 'id'); if (id === '') { throw new ERR_INVALID_ARG_VALUE('id', id, 'must be a non-empty string'); } requireDepth++; try { return Module._load(id, this, /* isMain */ false); } finally { requireDepth--; } }; 從上面就可以看出, 關鍵是在 Module._load 那我們再看一下 Module._load 的程式碼 // Check the cache for the requested file. // 1. 假如一個 module 已經存在快取中, 直接返回其 exports 的物件 // 2. 假如 module 是原生系統內部的 module (ex: file, path), // 呼叫 NativeModule.prototype.compileForPublicLoader() 並且返回其 exports

[Laravel] 讓你的 Helper 更有彈性 (使用 facades)

在 Laravel 中,有些常使用的 class 像是: Cache 在進行單元測試的時候,因為 Cache 本身繼承 Facade 所以可以很容易地在單元測試中 mock Cache ex: Cache::shouldReceive('get') ->once() ->with('key') ->andReturn('value'); 如果像是我們自己實作的 Helper,也想要在靜態類別也可以有 mockery 的 shouldReceive 該如何實作? 官方文件有提到可以使用 Facades 舉我們自己建立的 HttpHelper 為例 1. 建立 HttpHelper class <?php namespace App\Helpers; use GuzzleHttp\Client; use GuzzleHttp\Exception\RequestException; use Illuminate\Http\Request; class HttpHelper { // ... 功能略 } 2. 建立 Provider,並且將 HttpHelper 綁定到這個 HttpServiceProvider php artisan make:provider HttpServiceProvider <?php namespace App\Providers; use Illuminate\Support\ServiceProvider; use Illuminate\Support\Facades\App; class HttpHelperServiceProvider extends ServiceProvider { public function boot() { } /** * Register the application services. * * @return void */ public function register() { App::bind('Ht

[PHP] Lumen 沒有 php artisan serve 但又想要有類似的功能怎辦?

來源: https://stackoverflow.com/questions/47385324/laravel-controller-error-when-using-request-in-function 解法: php -S 127.0.0.1:8000 -t ./public

[PHP] 在 MacOS 上安裝 php mongodb driver

圖片
因為用mac透過 pecl 去做一定會狂出問題 所以自己編譯會比較方便 $ git clone https://github.com/mongodb/mongo-php-driver.git $ cd mongo-php-driver $ git submodule update --init $ phpize $ ./configure $ make all $ sudo make install 假如出現 Security/Security.h file not found 可以參考這篇 https://stackoverflow.com/questions/53531008/pecl-install-mongodb-on-mac-fatal-error-security-security-h-file-not-found cd mongo-php-driver/include ln -s /Library/Developer/CommandLineTools/SDKs/MacOSX.sdk/System/Library/Frameworks/Security.framework/Versions/A/Headers/ Security ln -s /Library/Developer/CommandLineTools/SDKs/MacOSX.sdk/System/Library/Frameworks/CoreFoundation.framework/Versions/A/Headers/ CoreFoundation brew install pcre make 最後記得編輯 php.ini vi /etc/php.ini 在裡面新增 extension=mongodb.so 可以先用 php -i | grep extension_dir 得知extension directory在哪 大概像是這樣: 之後進去該目錄,檢查 mongodb.so 是否在裡面 然後用 php -m | grep mongo 檢查是不是有進到設定檔中 這篇也有參考價值 https://www.jianshu.com/p/1fd7c1927ae5 brew install autoconf 如果出現找不到 ph
ifconfig eth0:0 192.168.2.4

[Linux] CentOS python2.6 升級 2.7 但不影響yum, 安裝pip

Ref: https://snippetinfo.net/media/1955 https://www.itread01.com/articles/1498939033.html yum groupinstall "Development tools" yum install zlib-devel bzip2-devel openssl-devel ncurses-devel sqlite-devel cd /opt wget --no-check-certificate https://www.python.org/ftp/python/2.7.6/Python-2.7.6.tar.xz tar xf Python-2.7.6.tar.xz cd Python-2.7.6 ./configure --prefix=/usr/local make && make altinstall 其實主要需要解決的是系統 Python soft link 指向 Python2.7 版本後 因為yum是不兼容 Python 2.7的 所以yum不能正常工作 我們需要指定 yum 的Python版本 vi /usr/bin/yum 將文件頭部的 !/usr/bin/python 改成 !/usr/bin/python2.6 (此處為系統內原本python2.6的位置) 然後把新裝好的 python 用 soft link 指回去 /usr/bin/python 就可以囉! ln -s /usr/bin/python2.7 /usr/local/bin/python 另外不想用yum install python-pip的話 可以用: curl https://bootstrap.pypa.io/get-pip.py -o get-pip.py python get-pip.py # pip安裝好之後可以使用 pip -V 看版本 # 要安裝套件就直接 pip install 套件 pip install flask pip install redis pip install scrapy

[Nginx] 使用轉址做負載平衡

Ref: http://blog.51cto.com/smileyouth/1623766 https://serverfault.com/questions/597671/load-balancing-in-nginx-with-redirect-rather-than-proxy https://stackoverflow.com/questions/46515842/nginx-proxy-pass-same-protocol-http-https 有個需求是這樣的 現在前端使用某一個 url, 假設是 http://example.com/test 然後希望前端載入這個網址的時候, 可以讓這個 url 隨機導向N個不同的網域, 假設是 a.example.com, b.example.com, c.example.com 但是後面路徑要是一樣的 也就是 http://example.com/test?t=1 -> http://c.example.com/test?t=1 這樣該怎麼做呢? 先假設 nginx 路徑是安裝在 /usr/local/nginx 先建立一個 /usr/local/nginx_module的目錄 安裝這個 module 要先下載另一個 ngx_devel_kit 先到  https://github.com/simplresty/ngx_devel_kit/tags 找個版本下載 cd ~ && wget https://github.com/simplresty/ngx_devel_kit/archive/v0.3.1rc1.tar.gz tar zxfv v0.3.1rc1.tar.gz #把解壓縮出來的目錄去掉版本號 mv ngx_devel_kit-0.3.1rc1 ngx_devel_kit && mv ngx_devel_kit /usr/local/nginx_module/ 然後接著下載  set-misc  這個 module 先到  https://github.com/openresty/set-misc-nginx-module/tags 找個版本下載 cd ~ && wget http

[Nginx] 幫 nginx 特定網址加上 basic auth

Ref: http://www.ttlsa.com/nginx/nginx-basic-http-authentication/ https://serverfault.com/questions/505482/nginx-auth-only-for-given-location 假如說有需要對特定的網址加上簡單的驗證保護 又懶得去新增比較複雜的會員機制 就可以考慮簡單的 Nginx Basic Auth 這個方法 一般情況下, ngx_http_auth_basic_module 是已經被包含在預設安裝內了 所以假設我需要對 /abc 這個網址去做驗證 可以新增以下語法(以PHP為例) location = /abc { auth_basic "basic http auth for this site"; auth_basic_user_file /etc/nginx/conf.d/htpasswd; try_files $uri $uri/ /index.php?$args; } 然後可以使用 htpasswd 來驗證 以上面的例子而言, 可以將帳號密碼新增到 /etc/nginx/conf.d/htpasswd內 假設新增帳號: abc, 密碼: 123456 printf "abc:$(openssl passwd -crypt 123456)\n" >>/etc/nginx/conf.d/htpasswd 接著可以確認自己 nginx 有沒有出錯 可以使用以下指令並 reload nginx nginx -t nginx -s reload