發表文章

[ jenkins ] Install Jenkins On Ubuntu [incomplete]

圖片
Ref: https://wiki.jenkins-ci.org/display/JENKINS/Installing+Jenkins+on+Ubuntu http://alex-dai.logdown.com/posts/2016/04/17/jenkins-bitbucket-ssh-key wget -q -O - https://pkg.jenkins.io/debian/jenkins-ci.org.key | sudo apt-key add - sudo sh -c 'echo deb http://pkg.jenkins.io/debian-stable binary/ > /etc/apt/sources.list.d/jenkins.list' sudo apt-get update sudo apt-get install jenkins
安裝ssl & letsencrypt certbot

圖片
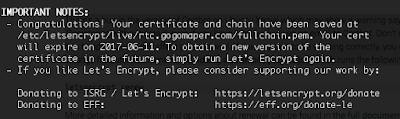
https://www.namecheap.com/support/knowledgebase/article.aspx/9419/0/nginx cat certificate.crt ca_bundle.crt >> ca.chain.crt 將certificate.crt & ca_bundle.crt 輸出到 ca.cahin.crt 然後根據nginx的設定 ssl_certificate /home/ubuntu/project_dir/ssl/license/ca.chained.crt; ssl_certificate_key /home/ubuntu/project_dir/ssl/license/private.key;記得將private.key也替換上去! ################################################################## 題外話: 再裝nginx的時候 (on ubuntu16.04), nginx竟然會無法stop/restart 最後只能先跑一次 ps -ef | grep nginx kill <pid> 之後才可以正常stop/restart ..Orz 移除nginx sudo apt-get purge nginx nginx-common Ref:   https://certbot.eff.org/#ubuntuxenial-nginx https://certbot.eff.org/docs/using.html#certbot-commands 首先先安裝letsencrypt sudo apt-get install letencrypt 接下來使用webroot的方式驗證這個domain真的是屬於你的 letsencrypt certonly --webroot -w /var/www/你的domain -d 你的domain 註: webroot是letsencrypt利用在本機產生檔案, 然後透過domain驗證 來確認這個domain真的是你的 ex: letsencrypt certonly --...

[ mongodb ] aggregation example

MySQL中可以做 JOIN, GROUP BY, .. 但在Mongodb就必須靠 aggregation 像Left outer join在Mongodb要用特別的operator : $lookup 官網有提供一些簡單的MySQL to Mongodb aggregate的語法範例 https://docs.mongodb.com/v3.2/reference/sql-aggregation-comparison/ 小舉例 db.collection('collName').aggregate([     {          $match: matchQuery         // 搜尋條件式, 符合的documents傳給下個階段     },     {         $project: {                         // 將上個階段的documents取出指定欄位傳給下個階段             user: 1, place: 1, createdAt: 1          }       },     {         $group: {                       // 將上個階段的documents給group成指定的物件             _id: "$user",               // _id...

[ Node.js ] winstonjs rangeError Maximum call stack size exceeded

Reference:  https://github.com/winstonjs/winston/issues/862 在 winston/common.js 第217行 加入 options.meta = meta; https://github.com/winstonjs/winston/blob/master/lib/winston/common.js#L217 // Remark: this should really be a call to `util.format`. // if ( typeof options . formatter == ' function ' ) { options . meta = meta; return String ( options . formatter ( exports . clone (options))); }

Mongodb 調校過程記錄

圖片
Mongodb

[ Mongodb ] 在ubnutu 14.04上安裝mongodb

https://docs.mongodb.com/manual/tutorial/install-mongodb-on-ubuntu/ https://www.digitalocean.com/community/tutorials/how-to-install-mongodb-on-ubuntu-14-04 sudo apt-key adv --keyserver hkp://keyserver.ubuntu.com:80 --recv EA312927 echo "deb http://repo.mongodb.org/apt/ubuntu trusty/mongodb-org/3.2 multiverse" | sudo tee /etc/apt/sources.list.d/mongodb-org-3.2.lis sudo apt-get update sudo apt-get install -y mongodb-org Remove mongodb Try searching for installed mongo packages with  dpkg  : $ sudo dpkg -l | grep mongo That should output a list of packages with mongo in the name. If there are still files left on the system following an  apt-get remove mongo , try and run the command again with the  --purge  switch, using a wildcard search for the name: sudo apt-get remove mongodb* --purge

看mongodb log

Ref: http://stackoverflow.com/questions/15204341/mongodb-logging-all-queries I ended up solving this by starting mongod like this (hammered and ugly, yeah... but works for development environment): mongod --profile=1 --slowms=1 & This enables profiling and sets the threshold for "slow queries" as 1ms, causing all queries to be logged as "slow queries" to the file: /var/log/mongodb/mongodb.log Now I get continuous log outputs using the command: tail -f /var/log/mongodb/mongodb.log An example log: Mon Mar 4 15:02:55 [conn1] query dendro.quads query: { graph: "u:http://example.org/people" } ntoreturn:0 ntoskip:0 nscanned:6 keyUpdates:0 locks(micros) r:73163 nreturned:6 reslen:9884 88ms