發表文章

目前顯示的是 8月, 2018的文章

[Node.js] Sequelize 小常識 (不定時更新這篇)

圖片
一般使用 sequelize-cli 前, 必須先執行下列指令做初始化 sequelize init --force 要建立model: sequelize model:generate --name User --attributes name:string,nickname:string,age:integer # 會自動產生 createdAt 與 updateAt 的欄位 # 如果是想要產生 created_at, updated_at 的欄位的話 # 可以加入 --underscored 這個參數 sequelize model:generate --name User --attributes name:string,nickname:string,age:integer --underscored 如果需要預設語系是utf8mb4 需要自己修改套件 vim /usr/local/lib/node_modules/sequelize-cli/lib/commands/database.js # 莫約第38行 # `` 為es6 的 string template 的功能, 超實用 `CREATE DATABASE ${sequelize.getQueryInterface().quoteIdentifier(config.database)} DEFAULT CHARSET=utf8mb4 DEFAULT COLLATE=utf8mb4_general_ci` 之後下  sequelize db:create 就會直接是 utf8mb4 的語系囉 要像 Laravel 這樣可以去addColumn怎使用? ref:  https://stackoverflow.com/questions/46357533/how-to-add-delete-new-columns-in-sequelize-cli https://sequelize.readthedocs.io/en/latest/docs/migrations/ // 使用此指令建立 migration sequelize migration:create --name name_of_your_migration // 產生範例如下 module

[Nginx] 在 abc.com/abc/def.htm 這個特定網址導向(rewrite) subdomain cba.def, 其餘參數不變

location ~ /abc/def.htm(.*)$ { rewrite ^/(.*) http://cba.def/$1 permanent; } location ~ // 使用正規表達式,有視大小寫 location ~* // 代表使用正規表達式,忽視大小寫 # 當路徑符合 /test/js/test.js 無視後面帶什麼參數時,進去裡面 location ~* /test/js/test.js(.*)$ { # 檢查如果你進來的網址是 /test/js/test.js # 後面帶的參數會被 /test/js/test.js(.*) 的 (.*) 捕捉到 $1 # 然後將流量導向 /test/js/test.php # 並將後面帶的所有東西也補在 /test/js/test.php 後 rewrite ^/test/js/test.js(.*) /test/js/test.php$1 last; } location 中的 rewirte: 不寫last和break - 那麼流程就是依次執行這些rewrite 1. rewrite break - url重寫後,直接使用當前資源,不再執行 location 裡面剩下的語句,完成本次請求,地址欄url不變 2. rewrite last - url重寫後,馬上發起一個新的請求,再次進入server塊,重試location匹配,超過10次匹配不到報500錯誤,地址欄url不變 3. rewrite redirect – 返回302臨時重定向,地址欄顯示重定向後的url,爬蟲不會更新url(因為是臨時) 4. rewrite permanent – 返回301永久重定向, 地址欄顯示重定向後的url,爬蟲更新url 使用last會對server標籤重新發起請求 如果location中rewrite後是對靜態資源的請求,不需要再進行其他匹配,一般要使用break或不寫,直接使用當前location中的數據源,完成本次請求 如果location中rewrite後,還需要進行其他處理,如動態fastcgi請求(.php,.jsp)等,要用last繼續發起新的請求 (根的location使用last比較好, 因為如果有.php等fastcgi請求還要繼續處理)

[Shell] 同時跑N個 PHP Process

#!/bin/bash ### 定義顏色 YELLOW='\033[1;33m' GREEN='\033[0;32m' NC='\033[0m' ### 要執行的PHP程式, 預設是/path/to/xxx.php PHP_PROGRAM=${1:-/path/to/xxx.php} ### 指定國家, 預設是tw COUNTRY=${2:-tw} ### 根據哪個檔案, 預設是test.txt TARGET_FILE=${3:-test.txt} ### 檔案名稱, 預設是test FILE_NAME=${4:-test} ### 同時跑PHP進程數, 預設是8 CONCURRENT_PROCESS=${5:-8} echo -e "${YELLOW}開始執行${NC}" for i in $(seq 1 $CONCURRENT_PROCESS) do echo -e "${GREEN}/usr/local/php/bin/php $PHP_PROGRAM $COUNTRY $TARGET_FILE $FILE_NAME $CONCURRENT_PROCESS $(($i-1)) 18${NC}" /usr/local/php/bin/php $PHP_PROGRAM $COUNTRY $TARGET_FILE $FILE_NAME $CONCURRENT_PROCESS $(($i-1)) 18 & done echo -e "${YELLOW}執行完畢, 可以執行 ${NC} ps aux | grep $PHP_PROGRAM ${YELLOW} 觀看執行process ${NC}" exit;

[Zabbix] 基礎主機監控設定 - 客製化腳本發信

圖片
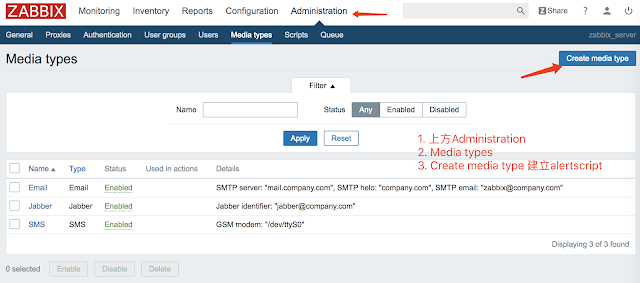
使用 客製化腳本 發信  apt-get install ssmtp mailutils # 備份 cp /etc/ssmtp/ssmtp.conf /etc/ssmtp/ssmtp.conf.default vi /etc/ssmtp/ssmtp.conf ######################################### # # Config file for sSMTP sendmail # # The person who gets all mail for userids < 1000 # Make this empty to disable rewriting. root=neilwang@intentarget.com # The place where the mail goes. The actual machine name is required no # MX records are consulted. Commonly mailhosts are named mail.domain.com mailhub=smtp.gmail.com:587 # Where will the mail seem to come from? #rewriteDomain= # The full hostname hostname=zabbix # Are users allowed to set their own From: address? # YES - Allow the user to specify their own From: address # NO - Use the system generated From: address #FromLineOverride=YES AuthUser=發郵件的帳號 AuthPass=發郵件的密碼 #Gmail可開啟兩階段驗證, 使用應用程式密碼 UseSTARTTLS=YES UseTLS=YES # 輸出除錯資訊 Debug=YES ######################################### vi /usr/lib/zabbix/alertscripts/sendgmail.sh ##################

[Zabbix] Zabbix 基礎安裝

圖片
首先先看官網:  https://www.zabbix.com/download 官網可以根據你的作業系統與zabbix版本, 給出對應的指令 我選擇的是 zabbix 3.4版 作業系統為 Ubuntu 16.04 使用MySQL, 換成MariaDB也可 安裝zabbix wget https://repo.zabbix.com/zabbix/3.4/ubuntu/pool/main/z/zabbix-release/zabbix-release_3.4-1+xenial_all.deb dpkg -i zabbix-release_3.4-1+xenial_all.deb apt update apt install zabbix-server-mysql zabbix-frontend-php zabbix-agent # 登入MySQL/MariaDB mysql -uroot -p password # 建立預設的 zabbix 資料庫 mysql> create database zabbix character set utf8 collate utf8_bin; # 建立 zabbix 用戶, 密碼設成 password (可把password換成自己想要的) mysql> grant all privileges on zabbix.* to zabbix@localhost identified by 'password'; mysql> quit; # 使用zabbix用戶將預設的table匯入zabbix資料庫內 zcat /usr/share/doc/zabbix-server-mysql*/create.sql.gz | mysql -uzabbix -p zabbix 安裝MySQL 可以參考: digital ocean sudo apt-get update sudo apt-get install mysql-server mysql_secure_installation # 觀看 mysql 是否真的有在 running systemctl status mysql.service 安裝PHP 可以參考我這篇: 安裝PHP add-