發表文章

目前顯示的是 2016的文章

[ Mongodb ] 在ubnutu 14.04上安裝mongodb

https://docs.mongodb.com/manual/tutorial/install-mongodb-on-ubuntu/ https://www.digitalocean.com/community/tutorials/how-to-install-mongodb-on-ubuntu-14-04 sudo apt-key adv --keyserver hkp://keyserver.ubuntu.com:80 --recv EA312927 echo "deb http://repo.mongodb.org/apt/ubuntu trusty/mongodb-org/3.2 multiverse" | sudo tee /etc/apt/sources.list.d/mongodb-org-3.2.lis sudo apt-get update sudo apt-get install -y mongodb-org Remove mongodb Try searching for installed mongo packages with  dpkg  : $ sudo dpkg -l | grep mongo That should output a list of packages with mongo in the name. If there are still files left on the system following an  apt-get remove mongo , try and run the command again with the  --purge  switch, using a wildcard search for the name: sudo apt-get remove mongodb* --purge
看mongodb log

Ref: http://stackoverflow.com/questions/15204341/mongodb-logging-all-queries I ended up solving this by starting mongod like this (hammered and ugly, yeah... but works for development environment): mongod --profile=1 --slowms=1 & This enables profiling and sets the threshold for "slow queries" as 1ms, causing all queries to be logged as "slow queries" to the file: /var/log/mongodb/mongodb.log Now I get continuous log outputs using the command: tail -f /var/log/mongodb/mongodb.log An example log: Mon Mar 4 15:02:55 [conn1] query dendro.quads query: { graph: "u:http://example.org/people" } ntoreturn:0 ntoskip:0 nscanned:6 keyUpdates:0 locks(micros) r:73163 nreturned:6 reslen:9884 88ms

[ Mongodb ] 最大連線數爆炸的問題處理, ulimit 修改問題

Ref: 由於每次發送 notification 都會讓server連不上 這次仔細看了db的log "connection refused because too many open connections mongodb" 之後才知道 Mongodb 預設的最大連線數是819還是820 所以在啟動 Mongodb 時要加上一個參數 --maxConns=64000 就是將最大連線數開到64000 但是!! 就是這個但是 萬萬沒想到這個 --maxConns 跟 ulimit -n 這個值有關係 如果可以下 ulimit -HSn 64000 就可以解決當然是最好的 不過我在 Ubuntu 14.04底下得到 -bash: ulimit: open files: cannot modify limit: Operation not permitted 登愣, 只好來問Google大神 得知以下幾個步驟 sudo vi /etc/security/limits.conf * soft nofile 64000 * hard nofile 64000 root soft nofile 64000 root hard nofile 64000 ( * 代表所有的 username 的樣子, 但是 root不歸屬於*中, 所以要額外再寫一次) 之後存檔, 不需重啟, 只需要重新 ssh 進來即可 (  另外如果重新 ssh近來沒有用的話, 請去檢查 /etc/ssh/sshd_config中  是不是有UsePAM yes, 沒有的話請補上, 然後 sudo service sshd restart就好 ) 另外在 /etc/pam.d/common-session & /etc/pam.d/common-session-noninteractive 內都要加上 session required        pam_limits.so 進入尾聲了 最後我的 Ubuntu不知道為啥 用一般user權限無法透過 ulimit -HSn 64000 只能到 4096 -> 最新消息 雖然網路上有部分的人說 改...

[ Elasticsearch ] Query DSL 緩慢更新中..

圖片
Query and filter context Elasticsearch 提供一個以JSON定義查詢式Query DSL 你可以將Query DSL想成是一個AST (abstract syntax tree) queries Query DSL 由兩種型態的查詢子句所組成 Leaf 查詢子句 用來查詢某個欄位的某個特定值 例如:   match , term  或  range Compound 查詢子句 包著其他的 leaf 查詢子句 或是 複合查詢 bool  或  dis_max  或  not  或  constant_score Query的行為視此Query使用的是query context或著是filter context Query context 傾向於更準確的搜尋 此query子句會產生 _score 來顯示match Filter context 比較像是全文搜索 比較像是回答 "這個文件是否符合此query子句" 常被用來過濾結構化的資料 例如: 這個文件的狀態是否被設定成已發布 常用filter搜尋的資料會自動被cache起來用以加速 Reference: 對岸好文 下列的例子在search api中使用了query與filter context 此query將會符合以下的條件 title 欄位 包含 search這個字串 content 欄位 包含 elasticsearch這個字串 status欄位 等於 published這個值 publish_date欄位 包含 日期大於等於 1 Jan 2015 GET _search {       "query" : {       "bool" : {          "must" : [               { "match" : { "title" : "Search" ...

[ redis ] 安裝redis 3.2.4遇到的雷 與 額外的設定on Ubuntu

  byobu , 安裝  sudo apt-get install byobu 如果要每次透過文字介面登入時都自動啟動byobu,請輸入 byobu-enable 這次為了要使用redis當作cache 所以馬上抓了一台ec2來裝 至於為什麼不用Amazon Elasticache ? 因為我們需要處理geo query 這個feature從3.2.0才出現.. Amazon Elasticache只有2.8 所以只能含淚跳過了Orz 進入正題

[ pm2 ] 使用nvm跑不同版本的不同的node application

pm2 start app.js --name app1 --interpreter=/home/user/.nvm/versions/node/v0.12.0/bin/node nvm install :  https://github.com/creationix/nvm To install or update nvm, you can use the install script using cURL: curl -o- https://raw.githubusercontent.com/creationix/nvm/v0.32.1/install.sh | bash or Wget: wget -qO- https://raw.githubusercontent.com/creationix/nvm/v0.32.1/install.sh | bash #### use absolute path

[ Ubuntu 20.04 + 14.04 ] 重灌Server記錄

圖片
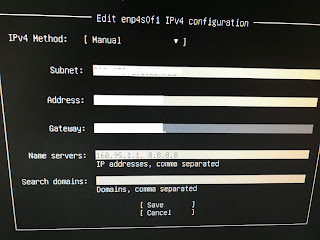
[Ubuntu 20.04] 一開始在 server 上插上 USB, 並且按 del 觸發 bios 設定 進去將 USB 開機設為第一優先開機順序 設定完之後按F10儲存變重開機 (以上要看各家主機的設定) 重開機後, Ubuntu 20.04 要先設定網路, 如果現在不設定, 後面不好改 主要是一開始沒網路的話,根本沒辦法使用 ifconfig (要另外安裝) 所以建議一開始就先讓網路暢通 Subnet: 代表你電腦 ip 所屬的子網路,可藉由遮罩算出來 Address: 代表這台電腦的 ip Gateway: 網路封包出口閘道 Name servers: DNS Search domains: 不用管 假設你的主機是 192.168.2.233,遮罩是 255.255.255.240 要怎麼算出子網路是多少? A: 255.255.255.240 = 11111111.11111111.11111111. 1111 0000 192.168.2.233 = 11000000.10101000.00000010. 1110 1001 將紅色部分做 bit operation and 後可以得到 11000000.10101000.00000010. 1110 0000 也就是 192.168.2.224 所以子網路就是 192.168.2.224 ============================================================ [Ubuntu 14.04] 一開始重灌就是USB插進去 Install Ubuntu 接著 跳過Partition那些步驟 如果不確定可以參考 這篇   或著是Google 搜尋 鳥哥 Linux 就會有教學囉 灌完後要先設定網卡 如果用下指令的方式, 只要重開機就會失效 (要看網卡資訊使用 ifconfig ) 所以使用 sudo vi /etc/network/interfaces 接著根據各自的機房設定先把設定設上去 auto lo iface lo inet loopback // 內網網卡 auto eth1 iface eth1 inet static     ...

[ Nodejs ] Module did not self-register

之前使用nvm時突然發現原本可以work的程式一直噴錯: Module did not self-register

[ Javascript ] CTJS Note

圖片
Redux設計概念與實戰 Redux 簡報:  http://slides.com/dmoon/redux-intro# Why   SPA more complecated   data跟view分開, 類似angular, data只有一份,data changed -> view changed React:   data and view bind Problem:   props傳遞地獄 Redux   predictabble state container  三大原則 Single source of truth 單一資料來源 整個應用的state存在一顆object tree中,並放在唯一的container(state)內 State is read only 唯一改變state的方法就是觸發action(修改資料唯一方法) Redux Flow    Produc -> 畫面需要改變 -> 產生action                                                                   |                                           Server <- action -> dispatch -> reducer                 ...